• Welcome
  • Health and Wellness
  • Homemaking
  • Recipes
  • Shop
  • Homeschool

Gluten-Free Pumpkin Bundt Closet Cake

May 14, 2025 by Quin Leave a Comment

Gluten-Free Pumpkin Bundt Closet Cake. What a name, right?

I came up with this cake for my oldest daughter’s half birthday this year.  She is the baker of our family, so I wanted to give her a break and try whipping something special for her to enjoy. I originally planned on carrot cake, but since we always keep pumpkin in the pantry, I figured if I could nail a pumpkin version, we’d have a go-to cake recipe with ingredients we always have on hand.

Well, everyone RAVED about it—I’m talking crumb-scraping-the-board kind of good. That’s a total mom win! 🙌

The kids and Mr. Awesome didn’t believe I made it from scratch (I’m not the baker in this house), and those who actually saw me make it couldn’t believe how good it turned out. Thanks, I think? 😂

They loved it so much that we’ve made it several times over the last two weeks. I even had others test it out to make sure it wasn’t just beginner’s luck, and now I feel confident enough to share the recipe.

Why “Closet Cake”?

My oldest son came up with the name because I literally hid the cake in our closet until the big half-birthday dinner reveal. The clothes in there smelled like sweet fall spice for a few days!

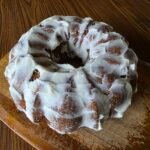
I did use a store-bought frosting because we found one with minimal ingredients and had it on hand. There is no sense in over-complicating things.

Also, I used my mixing bowl and a kitchen scale to measure everything in grams. I’ve really come to love baking this way—it’s consistent, makes fewer dishes, and everything I’ve baked by weight turns out better. Do you use a scale when you bake? I’ve included standard measurements after each ingredient, for your convivence.

Here are a few handy affiliate/referral links, like to my favorite flour, bundt pan, kitchen scale, and frosting.

Gluten-Free Pumpkin Bundt Closet Cake

Print Recipe Pin Recipe
Ingredients Method Notes

Ingredients
  

  • 1 Can Pumpkin puree 425g
  • 200 grams Granulated sugar 1 cup
  • 100 grams Brown sugar light or dark 1/2 cup
  • 180 grams Neutral oil I like avocado 3/4 cup
  • 4 Eggs
  • 260 grams King Arthur Gluten-Free All-Purpose Flour 2 cups
  • 5 grams Baking soda 1 teaspoon
  • 6 grams Baking powder 1½ teaspoons
  • 3 grams Salt ½ teaspoon
  • 9 grams Cinnamon 1 tablespoon
  • 60 grams OPTIONAL: Water ¼ cup

Method
 

  1. Preheat oven to 350°F. Grease a bundt pan thoroughly.
  2. In a large bowl, whisk together pumpkin puree, sugars, oil, and eggs, until smooth.
  3. Next, add the flour, baking soda, baking powder, salt, and cinnamon.
  4. Stir well. Add water if the batter seems very thick.
  5. Pour batter evenly into the prepared bundt pan and smooth the top.
  6. Bake for 50 minutes, or until a skewer comes out clean.
  7. Let cool in the pan for 15 minutes, then invert onto a wire rack to cool completely.

Notes

We have enjoyed this with and without cream cheese frosting (If you don’t make your own, I like the Miss Jones brand from Wal-Mart). The general consensus from everyone we have served it to is that it really does not need the frosting, and the flavor pops better without it.

Filed Under: All The Posts, Recipes

A Slightly Better Pea Salad – 7 Ingredients or Less

January 21, 2025 by Quin Leave a Comment


As a homemaker and momma of five, I’m always looking for simple, nourishing recipes that my family will enjoy. Over the years, I’ve learned to tweak old favorites into healthier, slightly better versions. This pea salad is one of those recipes—a fresh and flavorful alternative to the mayo-heavy pea salads I grew up with (and have fond memories of, but my body doesn’t agree with now).

Instead of mayonnaise and cheap oils, I use avocado oil for a lighter, healthier touch. The sweet crunch of peas, the smoky saltiness of bacon, and the zing from red onions all come together beautifully in this dish. I like to add just a drizzle of maple syrup for a subtle sweetness that takes it over the top!

The best part? This recipe is flexible. I don’t measure anything, and it always turns out delicious. Here’s how I make it: 

Ingredients
– Frozen peas: I use 4 pounds for our family, which gives us plenty for dinner and leftovers. 
– Bacon: Cooked and diced into bite-sized pieces.
– Red onion: Diced small for just the right amount of zing. 
– Avocado oil: Drizzled for a creamy texture without the heaviness of mayo. 
– Salt and pepper: To taste. 
– Maple syrup: A little drizzle to sweeten things up. 

Instructions
1. Thaw and rinse the frozen peas, then drain well.
2. Cook and dice the bacon. (Tip: Cook extra for snacking—it’s impossible not to!) 
3. Dice the red onion into small pieces. 
4. In a large bowl, combine the peas, bacon, and onion.
5. Drizzle with avocado oil, season with salt and pepper, and add just a touch of maple syrup.
6. Gently toss until everything is evenly coated.

Why I Love This Recipe:
This pea salad is quick to make, kid-friendly, and perfect for potlucks or family dinners. It’s also versatile—feel free to add shredded cheese, nuts, or even fresh herbs if you like. 

It’s a slightly better choice for those looking to avoid processed ingredients while still enjoying a creamy, delicious side dish. I hope your family loves it as much as mine does!

If you give this recipe a try, let me know how it turns out in the comments, or tag me if you share a picture online. I’d love to hear about any tweaks or additions you make!

With love, 
Quincey
A Slightly Better Wife

Gluten & Dairy Free Pea Salad – 7 Ingredients or Less

Print Recipe
Ingredients Method

Ingredients
  

  • – Frozen peas: I use 4 pounds for our family which gives us plenty for dinner and leftovers.
  • – Bacon: Cooked and diced into bite-sized pieces.
  • – Red onion: Diced small for just the right amount of zing.
  • – Avocado oil: Drizzled for a creamy texture without the heaviness of mayo.
  • – Salt and pepper: To taste.
  • – Maple syrup: A little drizzle to sweeten things up.

Method
 

  1. Thaw and rinse the frozen peas, then drain well.
  2. Cook and dice the bacon. (Tip: Cook extra for snacking—it’s impossible not to!)
  3. Dice the red onion into small pieces.
  4. In a large bowl, combine the peas, bacon, and onion.
  5. Drizzle with avocado oil, season with salt and pepper, and add just a touch of maple syrup.
  6. Gently toss until everything is evenly coated.

Filed Under: Recipes

How to Make a Slightly Better Gluten-Free Loaf of Bread in a Zojirushi PDC20BA

October 21, 2024 by Quin Leave a Comment

After much research and consideration, and listing a few unused items on Facebook Marketplace, I bought the best bread machine for our family a few years ago. I have been making a few loaves a week ever since.

This post will contain affiliate links.


It’s the Zojirushi PDC20BA->

I learned early on that to get the most consistent loaves each time I needed to ditch the measuring cups and use a kitchen scale.


I started with the recipe from Zojirushi and tweaked it for our family based on our intolerances and preferences.

I use:
400 g water

3 duck eggs (as a few of us are intolerant to chicken eggs)

15 g Vinegar or Apple Cider Vinegar (Aldi)

36g Olive or Avocado Oil (Aldi)

40g Honey, local when possible

320 g Potato or Corn Starch –> https://www.vitacost.com/vitacost-potato-starch-flour-non-gmo-and-gluten-free-32-oz-2-lbs-907-g-2

228g Rice Flour –> https://www.vitacost.com/bobs-red-mill-white-rice-flour-24-oz-resealable-pouch

8g Xanthan Gum –> https://www.vitacost.com/now-foods-xanthan-gum

8g Salt –> https://www.vitacost.com/redmond-real-salt-ancient-sea-salt-fine

9g Yeast –> https://www.walmart.com/ip/Fleischmann-s-Active-Dry-Yeast-4-Oz/10306743?athbdg=L1600


Loaf yield for each store-bought ingredient

(I wish I had known this when I started before I bought a massive supply of some items and only a few of others):
1 33.8oz bottle ACV=66 loaves
1 16.9oz bottle Olive Oil= 13.88 loaves
1 32oz box of Potato Starch =2.83 loaves
1 24ox bag of Rice Flour =2.98 loaves
1 6oz bottle of Xanthan Gum= 21.25 loaves
1 26oz bag of Salt= 98.26 loaves
1 jar of Yeast= 12.55 loaves

I bought a big supply of Xanthan Gum before I realized one bottle could make 21 loaves. Lesson learned!


I like that this machine makes substantial-sized loaves of bread that can often serve our large family for at least 2 meals. Cutting the bread slices in half makes a sandwich that is just right for the little ones.

I have not figured out the cost per loaf for 2024 (many items have increased in price, so I’ll do this soon and update here), but for 2022:
A loaf with potato starch, olive oil, & duck eggs=$5.14
A loaf with corn starch, olive oil, and duck eggs=$5.63

Happy Baking! If you have any questions please send me a DM over on Instagram.

Gluten Free Bread

Print Recipe
Ingredients

Ingredients
  

  • 400 g water
  • 3 duck eggs as a few of us are intolerant to chicken eggs
  • 15 g Vinegar or Apple Cider Vinegar Aldi
  • 36 g Olive or Avocado Oil Aldi
  • 40 g Honey local when possible
  • 320 g Potato or Corn Starch –> https://www.vitacost.com/vitacost-potato-starch-flour-non-gmo-and-gluten-free-32-oz-2-lbs-907-g-2
  • 228 g Rice Flour –> https://www.vitacost.com/bobs-red-mill-white-rice-flour-24-oz-resealable-pouch
  • 8 g Xanthan Gum –> https://www.vitacost.com/now-foods-xanthan-gum
  • 8 g Salt –> https://www.vitacost.com/redmond-real-salt-ancient-sea-salt-fine
  • 9 g Yeast –> https://www.walmart.com/ip/Fleischmann-s-Active-Dry-Yeast-4-Oz/10306743?athbdg=L1600

Filed Under: Homemaking, Recipes Tagged With: Homemaking

Gluten Free Big Batch Scotcheroo Bars

August 11, 2024 by Quin Leave a Comment

2 C. Sugar
1 Bottle Corn Syrup (16oz)
1 Jar Peanut Butter (16-18oz)
12 C. Crispy Rice Cereal (Malt-0-Meal brand is gluten-free)
1 bag of Dairy-Free chocolate chips for a rich layer of chocolate on the tþp. Use slightly less for a thinner layer

1. Oil a 10×15 pan I like this non-toxic one from CasaWare that my mom gifted me years ago:
2. In a large saucepan, combine sugar and corn syrup over medium heat. Stir until the sugar dissolves,
3. Quickly take it off the heat and mix in peanut butter. I love that you don’t need to measure this sticky deliciousness, just scoop it all in,
4. Once it’s all combined add in the crispy rice cereal until it’s well coated.
5. Next push the mixture into the oiled pan. The firmer you pack it in the better your bars will stay together.
6. Melt Chocolate over a double boiler and pour it over the bars and spread it evenly with a rubber scraper
7. To help the chocolate set put the pan in the fridge to cool for 30-45 minutes. Set a timer, because if they stay in too long the bars will get hard.

Yummy Big Batch Scotcheroo Bars

Print Recipe
Ingredients Method

Ingredients
  

  • 2 C. Sugar
  • 1 Bottle Corn Syrup 16oz
  • 1 Jar Peanut Butter 16-18oz
  • 12 C. Crispy Rice Cereal Malt-0-Meal brand is gluten-free
  • 1 bag of Dairy-Free chocolate chips for a rich layer of chocolate on the tþp. Use slightly less for a thinner layer

Method
 

  1. Oil a 10×15 pan I like this non-toxic one from CasaWare that my mom gifted me years ago:
  2. In a large saucepan, combine sugar and corn syrup over medium heat. Stir until the sugar dissolves,
  3. Quickly take it off the heat and mix in peanut butter. I love that you don’t need to measure this sticky deliciousness, just scoop it all in,
  4. Once it’s all combined add in the crispy rice cereal until it’s well coated.
  5. Next push the mixture into the oiled pan. The firmer you pack it in the better your bars will stay together.
  6. Melt Chocolate over a double boiler and pour it over the bars and spread it evenly with a rubber scraper
  7. To help the chocolate set put the pan in the fridge to cool for 30-45 minutes. Set a timer, because if they stay in too long the bars will get hard.

Filed Under: Recipes

Friday Night Family Dinner Ideas (Gluten-Free & Dairy-Free)

July 26, 2024 by Quin Leave a Comment

Coconut Curry Shrimp with Veggie Noodles
Taco Bowls with Almond Flour Tortillas
Steak Fajitas with Gluten-Free Wraps and Guacamole
Baked Salmon with Roasted Vegetables and Quinoa
Chicken Stir-Fry with Brown Rice
Turkey Burgers on Gluten-Free Buns with Sweet Potato Fries
Black Bean Burgers with Fresh Cut Veggies
Gluten-Free Pasta with Marinara Sauce and Grilled Chicken
Tuna Salad with Lettuce Wraps
Soup and Salad Night (Using gluten-free and dairy-free options)

This post contains affiliate links.

My favorite kitchen items can be found HERE.

Filed Under: Homemaking, Recipes Tagged With: Homemaking, Recipes

Slightly Better Granola Cereal

October 4, 2023 by Quin Leave a Comment

This Homemaker made Homemade Granola this afternoon. Anyone else doing this?
We had occasionally been buying #glutenfree granola cereal at $3 a bag, but when the price went to almost $4 for just 12 oz, I knew it was time to make my own.

This is a basic beginner level recipe. You can add things to it like raisins, nuts, or other dried foods that you like.

Recipe:

4 C. Rolled Oats (make sure they’re gluten free)
1/2 C. Melted Coconut Oil
1/2 C. Honey
A few shakes of Cinnamon (for flavor)

Bake at 350° for 20 minutes

If you’re adding dried fruit, do that after it’s cooked, so you don’t dry them out too much.

After it’s good and cool I store this in the fridge in a Mason jar that I’ve removed the air from. It would be fine on a shelf for the week.

Adjust baking times as needed to your desired doneness, stir half way through if you’d like (I don’t).

Filed Under: Recipes Tagged With: Homemaking

Banana Peanut Butter Cacao Treat

June 21, 2023 by Quin Leave a Comment

Look, I’m not applying to be a food photographer anytime soon, but as someone with a fierce sweet tooth AND a desire to do SLIGHTLY BETTER in the nutrition department- this is a golden ticket snack idea that I needed to share with you! Put the kids to bed and every once in a while feast on this simple treat.
————
1 Banana
1 loaded spoonful of good peanut butter
A sprinkle of organic cacao nibs

Smile. Eat slowly and mindfully, chewing well through each bite. Hand wash, dry, and put away your dish, and then carry on with your evening.
————
#intentionalliving #aslightlybetterlife #slightlybetter #asbwkitchen
#celebrateabsolutelyeverything

Filed Under: Recipes

Gluten Free & Dairy Free Spring Egg Rolls

January 13, 2023 by Quin Leave a Comment

On the menu this week: Our version of egg rolls, or maybe they’re actually spring rolls? They’re delicious, no matter what they’re called.

Filling: I put cabbage, carrots, and spinach in the food processor. You can do this ahead of time and store it in the fridge.

Cook up turkey sausage, add the chopped veggies, and drizzle in some coco aminos, or whatever flavoring you’d like and let that cook together for a bit.

Wrap in rice paper, and lightly spray with olive oil.

We bake them in the oven (oil your pan first). Like my Grandma Edna said in many of her recipes, “bake until done”. 😉

I bake them at 350° for about 20 minutes, because we were also making cookies at the same time. You could definitely turn up the heat and cook them for less time.

Note: We use rice paper because it’s gluten-free.

We’ve made this before and it was a hit! I know it’s not super authentic, but we love it. I’m grateful for our amazing neighbor, Kong, who taught us the basics of making an egg roll, and hopefully isn’t disappointed in the modifications we made. Ha!

Filed Under: All The Posts, Recipes

Quick and Easy Nourishing Fuel

December 31, 2022 by Quin Leave a Comment

Peanut Butter Protein Powder
Collagen Powder
Organic Camu Camu Powder
Raw Cocoa Powder
Organic Beet Powder

Put about 4oz of water in a 16oz jar or glass

Add your preferred powders. I use all of these above, and also add turmeric most days as well.

Combine using my favorite handheld whisk

Fill the remainder of the jar with water and give it a quick stir.

Enjoy quickly! If the powders begin to settle to the bottom of the jar you can give your glass a swirl by hand, or pop the whisk back in.

To switch it up, add the ingredients above to a blender with a banana, a handful of berries, and a little more water. The fruit helps keep the powders from settling, and provides additional nutrition.

Filed Under: Recipes

A Slightly Better Hot Cocoa {Gluten & Dairy Free}

December 9, 2022 by Quin Leave a Comment

If you’re looking for a Gluten Free & Dairy Free Hot Cocoa recipe that’s slightly better for you than a prepackaged mix, but just as easy, I’ve got you covered!

A Slightly Better Hot Cocoa
1/2 Cup Cocoa powder
1 Cup Collagen Powder
1/2 Cup Coconut Milk Powder
1-3 tsp Cinnamon (depending on your preference)
1/2 Cup Maple Sugar (add more if you like it sweeter)
1/2 tsp Quality Salt

I added all of these to a mason jar and gave it a good shake for a minute.

To enjoy: Add 1 Tablespoon of the dry mix into a cup of hot water and stir. You can add another Tablespoon if you like it richer. I like to use a milk frother (I don’t froth milk, ever, but I love this little tool for mixing powders into water it gives it a smooth finish).

You may substitute the ingredients above as you need to with what you have available. I think the important thing here is to be intentional with the ingredients and think of what each one might do within your own body. Will a warm cup of hot cocoa support and nourish your body, or leave you with low energy levels and a sugar crash? Pay attention to how you feel after you consume any food or beverage and make adjustments as needed.

I ordered the coconut milk powder and maple sugar from Thrive Market to experiment with because those are things I haven’t normally kept on hand, and there was a great coupon available the day I ordered. If you are new to Thrive Market you can get 40% off your first order by clicking this link to place an order and start a membership ($60/year). With the discounts offered throughout the year, it pays off for us to have it for things like toothpaste and specialty grocery items.

After trying the base recipe above I added a little turmeric powder and beet powder to my jar because we always have those in the house and I add them to my morning smoothies for added nutrition. I’m used to the flavors. That may be weird for you, and that’s fine. Ha!

My oldest daughter loves sweets and thinks it’s important to mention that this isn’t as sweet as the blue box hot chocolate you may be used to. She said it is good and creamy though and it’s worth trying!

There are two ways to remedy this: You can either train your brain that this is better for you and decide to get used to it, or you can add more maple sugar or a spoonful of maple syrup in your cup as you wish.

If you give this a try I’d love to hear your feedback!

A Slightly Better Hot Cocoa

Print Recipe
Ingredients Method

Ingredients
  

  • 1/2 Cup Cocoa powder
  • 1 Cup Collagen Powder
  • 1/2 Cup Coconut Milk Powder
  • 1-3 tsp Cinnamon depending on your preference
  • 1/2 Cup Maple Sugar add more if you like it sweeter
  • 1/2 tsp Quality Salt

Method
 

  1. I added all of these to a mason jar and gave it a good shake for a minute.
  2. To enjoy: Add 1 Tablespoon of the dry mix into a cup of hot water and stir. You can add another Tablespoon if you like it richer. I like to use a milk frother (I don’t froth milk, ever, but I love this little tool for mixing powders into water it gives it a smooth finish).

Filed Under: All The Posts, Homemaking, Recipes Tagged With: Homemaking, Recipes

  • 1
  • 2
  • 3
  • 4
  • Next Page »

Welcome!

Categories

  • All The Posts (196)
  • Celebrate Absolutely Everything (48)
  • Encouragement (21)
  • Gift Guides (10)
  • Health and Wellness (13)
  • Homemaking (66)
  • Homeschool (32)
  • Marriage (6)
  • Parenting (61)
  • Recipes (33)
  • Thanks (4)

Copyright

Feel free to share links from A Slightly Better Life as long as they’re used in a kind, respectful way and proper credit is given. I ask that you include a link back to this site when you share, not copy the text.

All content is owned by Quincey B. and may not be republished elsewhere without permission.

Pinning to Pinterest? Sharing to Facebook or Instagram? Absolutely – and thank you!

Disclosure

As an Amazon Associate, I earn from qualifying purchases. This site contains affiliate links, which means I may earn a small commission if you click and purchase, at no extra cost to you. Thank you for supporting A Slightly Better Life!

Copyright © 2025 · Foodie Pro Theme on Genesis Framework · WordPress · Log in