• Welcome
  • Health and Wellness
  • Homemaking
  • Recipes
  • Shop
  • Homeschool

All Are Welcome

April 22, 2015 by Quin Leave a Comment

Last weekend we hosted a birthday party celebrating another year of Mr. Awesome’s life.  We closed off the bedrooms, and opened up every other door in our 1500 sq. ft home.  We swept the garage, moved a few things, and welcomed in over 90 of our friends, neighbors, co-workers, and family.  There were even a few people we hadn’t yet met, but were delighted to serve anyway.
Yes, truly delighted.
You see we prayed for this party for weeks.  We prayed hard for clear skies, so we could use our spacious backyard.  That wasn’t in God’s plan.  Early in the afternoon there were massive sheets of rain rolling in, and we learned we’d be hosting this party indoors.  We were away at a volleyball tournament that morning and couldn’t prepare our home fully, but we trusted it would be okay.  Above all we prayed for our home to be a safe gathering place for everyone to come and make connections.
This party wasn’t about us. This party was about God. It was about connecting His people.
It’s so cool to sit back and watch people from all different walks of life, and different social groups come together and converse.  Some of these people we’ve known our entire lives, others we have known far less, not known extremely well, or not known at all. Regardless, they were all so kind to us, and to each other.
At one point during the party I took a breather in the bathroom, I fell to the floor and thanked God for His marvelous works in orchestrating what was happening.
As I walked around our home Saturday night listening to bits and pieces of the conversations that were happening, I was humbled and my heart was bursting with Joy.  There were so many smiles, and so much laughter.  There were so many good, helpful, deep conversations happening within the walls of our small ranch home, basement, and our garage.  I felt a sense of Pure Joy.
I hadn’t stressed over cleaning for the party (which was evident this morning {4 days later}, as I realized the amount of things I spaced off cleaning- the piles on top of the fridge, the smears on the windows, toys & mail laying around etc.)  It’s not that I’m a bad housekeeper, or a great housekeeper, it’s just that those things didn’t seem important to me at the time.
I didn’t stress over the food.  We did a simple menu of Sub Sandwiches, Chips, and Cake.  Our drink menu was 2
liters of soda, bottled water, and a keg of beer.  All served from simple disposable dinnerware.  I wasn’t sure how many
people we’d have (my ball park guess was about 30 short), but somehow the 24 feet of subs that we ordered were almost entirely devoured and we had minimal leftovers, which we were able to disperse and still have enough to enjoy two extra meals from.
From the time we decided this party needed to happen, until the time we closed the last folding table and put a clip on the final bag of chips, everything just worked out.  I trusted that God would provide, and He did.
I serve a faithful, loving God who delights in seeing us open our homes to everyone, not just those who will invite us to theirs, or pay us back in some way.
What would hold you back from hosting a
gathering where All Are Truly Welcome?

Filed Under: All The Posts, Celebrate Absolutely Everything Tagged With: Celebrate Absolutely Everything

DIY: Convert a Standard Kid’s Bike Into a Balance Bike

April 3, 2015 by Quin Leave a Comment


Not to brag, but I really love teaching kids to ride their bikes, and most of the kids love learning too!
One of the quickest ways to teach them to ride without training wheels is to first teach them to balance on two wheels.

In order to learn balance, they need to be able to reach the ground.  Remember that when buying a bike.  That’s super important.  Don’t buy a bike too big for your child, or you’re just asking for trouble.  Yes, I know it’s tempting to save a few bucks by buying a larger one they can use for a little longer, but it’s usually not worth it for their safety, and for their comfort level.

We have a tiny blue bicycle I picked up from a garbage pile a few years ago.  It was actually pink at the time, and maybe even from the 70’s.  Even though it clearly looked like garbage, my heart whispered that it was special.  So I brought it home, and with the help of my brother and my husband, we refurbished it.

I think I’ve taught 7 kids to ride without training wheels on that bike.  The first day or so we work on balancing by just using their feet on the ground, no peddles.  Then once they get going pretty smooth that way, we incorporate the peddles.  Works every time!

I’m sure you’ve heard of the craze with Balance Bikes, right?  I personally love them, but think they are WAY over priced.  Now to be honest, we did just get a  Strider No-Pedal Balance Bike for our youngest daughter, because we couldn’t modify one on our own to be short enough for her.  And because we got a crazy good deal on it that I just couldn’t refuse (Thank you Strider and Amazon!).

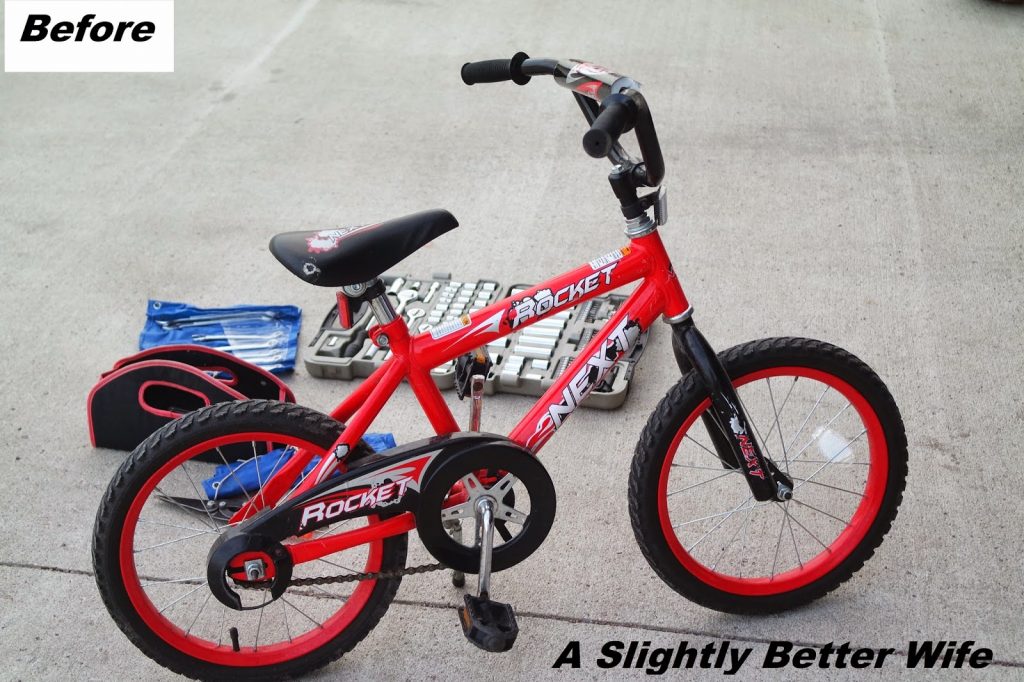
But just for fun, we made one for our son!  He’s 7 and has been riding the neighbor girl’s balance bike every chance he gets for a year, so I knew he would actually use this.

We converted his old $40 Wal-Mart bike into a balance bike in about 15  minutes, using a super helpful YouTube Video.  You can find used bikes EVERY WHERE.  Facebook, thrift stores, garage sales, etc.

I could try to write up steps for you, but honestly this guy covered it so well that I’m just going to direct you over to him:

Filed Under: All The Posts, Homemaking, Outdoor Tagged With: Amazon Love, Homemaking, Motherhood + Homemaking, Outdoor

Life Hack: Opening a Diary Lock Without the Key

April 1, 2015 by Quin Leave a Comment

Disclosure

Ever wondered how to open a diary lock with a bobby pin?  This post is for you!

Just a friendly #parenthack, #lifehack or whatev, in case you find yourself in the same predicament I was in this morning.  The rounded end of a bobby pin will pop these little locks open, easy peasy.
How To:
Stick the rounded end of the bobby pin into the lock.
Give it a little turn or jiggle.
It should slide the lock right open.
Now you know!

Filed Under: All The Posts, Homemaking Tagged With: Homemaking

How to Wash Your Oven Racks

March 31, 2015 by Quin Leave a Comment

It’s Spring Cleaning time!

Here is a quick tip for cleaning your oven racks.  Wash them in the tub or shower!

I like to soak mine with a little soap in the bath tub, then stand them up and spray them off.

You’d be surprised what a great job that alone does.  If you have tougher spots, do that plus give them a little scrub with some steel wool.  They’ll look like new!

For the inside of the oven I use a baking soda and water paste to scrub away the icky spills that have been baking into place for months (oops!).

I’ve never used the self cleaning feature on my oven, because 500 degrees for however many hours just freaks me out.  Maybe it works well though?  Have you used it?

Do you have any homemaker tips you’d like to share?

Filed Under: All The Posts, Homemaking Tagged With: Homemaking

Kitchen Gadgets Giveaway: Part 2.

March 24, 2015 by Quin Leave a Comment

I used to use my bulky mandoline slicer all the time to make our zucchini into pasta.  You can read about that by
clicking here.
I really like my mandoline, but once I got my Zoodle Slicer, there was just no going back!  I’m using smaller sized zucchinis than I was with the mandoline, which I’ve found I actually like better!  The flavor is more pleasant and the seeds aren’t even an issue in these little guys.
Once the garden comes in I’ll have to remember to pick my zucchinis
before they get giant (which can happen the matter of a day)!
 
What makes the Zoodle slicer so
great? 
·
This little thing takes up a tiny fraction of cupboard space.
It makes nice firm ‘noodles’.·
It’s easy to use.
If you’ve been around here awhile you know that when I fall in love with a product I want everyone I know to know about it so they can experience the awesomeness too!

That’s why I’m hosting
a giveaway for a Zoodle Slicer.

You can win by visiting my Facebook page and liking/commenting on the “Giveaway Time” picture, or by commenting on a blog post last week or this week!

***THIS GIVEAWAY IS NOW CLOSED. CHECK BACK OFTEN FOR MORE GIVEAWAYS, TIPS, AND INSPIRATION***

Yummy Zoodles!
After you have a bundle of zoodles cut, put them in a pan with a jar of spaghetti sauce and heat them up.  Delicious!

Filed Under: All The Posts, Homemaking Tagged With: Amazon Love, Homemaking

Homemade Ranch Dressing Mix

March 24, 2015 by Quin Leave a Comment

 
This Ranch Dressing Mix is SO easy peasy.
Those little packets of dry mix are super expensive; considering you can make your own with spices you probably mostly have on hand.  If you don’t have all of these on hand, I’d suggest getting them and making it anyway, this is pretty easy and leaves you feeling super accomplished!
I mostly use this in my taco soup recipe, which I just realized I don’t have a blog post up for that. I’ll add that to my to-do list!
Ranch Dressing Mix
2 TBSP. Parsley
1 tsp. Dill
1 tsp. Garlic Powder
1 tsp. Onion Flakes
½ tsp. Basil
½ tsp. Black Pepper
For Dressing: Whisk 1 TBSP. of ths Ranch Dressing Mix in with 1/3 C. Mayo and 1/4 C. Milk.
For Dip:  1.5 C. Sour  Cream per  1 TBSP of Ranch Dressing Mix.  Add salt to taste.

Filed Under: All The Posts, Recipes

Homemade Taco Seasoning Mix

March 24, 2015 by Quin Leave a Comment

Armed with a bunch of spices, some measuring spoons, a big mixing bowl, and my mother-in-law’s recipe, I set out to make up a long time family favorite.  Taco Seasoning Mix!
We order enough beef to fill our deep freeze each year. When my husband and I got married and first started ordering beef the only thing I knew how to do with it was put in Hamburger Helper (deep cringe).  After that I learned how to make tacos.  The more I settle into my homemaker role the more I learn to do with a basic pound of hamburger, but this is still a family favorite.

Taco Seasoning Recipe:
1/4 C  Dried Minced Onion
1/4 C Chili Powder
3 TBSP. Salt
4 tsp. Cornstarch
1 TBSP. Dried Minced Garlic
1 TBSP. Ground Cumin
1 TBSP. Crushed Red Pepper Flakes
2 tsp. Beef Bullion Granules
1.5 tsp. Dried Oregano
I mix it all up and store it in an air tight container in the fridge.  Use 2 TBSP. of the mix in each pound of hamburger with 8oz tomato sauce.  You can add a little water if it’s too thick.
Tip: Taco meat is easy to make up ahead of time and store in Ziploc bags in the freezer.
My late MIL, Dorothy, who would probably think this blog is ridiculous, but have tons of tips to pass on to all of you anyway.  She is so deeply missed by all of us! ♥

Filed Under: All The Posts, Recipes

How to Make Your Own Shell Ice Cream Topping

March 4, 2015 by Quin Leave a Comment

Did you know you can make your own hard ice cream topping?
Let’s get a little old fashion and give this a try, okay?
Now we don’t really have this often (ice cream, YES.  This topping though, no), I’d say maybe once or
twice a year.  It is nice to be able to make it yourself for two reasons:
1.     Less junk goes into it.
2.    We don’t have an extra bottle lying around taking up space in the cupboard. Do you see the label peeling off that thing?  I should probably chuck it!
I chose not to use fancy organic ingredients for this, but just to show you the bare bones of this recipe. Baby steps, right?
If you aren’t making it often, you certainly don’t need specialty items for it.  If you do however make your own peanut butter, buy the better coconut oil, and good dark chocolate, by all means, use those!  It’ll be delicious either way.
This tutorial is ridiculously easy.  Ready….
Mix Peanut Butter, Chocolate Chips (or whatever chocolate you have around), and Coconut Oil in a pan
on low-med.  Any higher and you’ll burn it.  Keep stirring until it has reached a nice liquid-like consistency.
Then drizzle it over your ice cream.  DONE!
 I wish I could show you a picture of this step, but folks, after stirring and smelling this peanut buttery goodness, I
set my camera down so I could indulge!  We also had friends over.  I didn’t want to seem TOO obsessed.
You other foodie type bloggers know what I’m talking about, don’t you?  You set the bowl down, snap a picture, give it a quarter turn, snap again.  Decide to move to the table, same drill, then realize it’s melting.  Give up, put the camera down and eat it before it’s a total waste.
*If you have a peanut allergy, ran out of peanut butter, or don’t like peanut butter {GASP}, it’s alright to just leave it out of the recipe.*
How it works?  The coconut oil gets hard as it hits the COLD ice cream, causing the mixture to take on a hard
consistency.
If you’re one of those people that need ratios, here it is:
1 C. Chocolate chips
1/2 C. Coconut Oil
1/4 C. Peanut Butter
I hardly ever measure this anymore though.  I just scoop out whatever amounts I feel like, being sure to use plenty of coconut oil and it always turns out perfect!
This is a fun treat for family nights, birthdays, etc.  It’s also an easy little kitchen project to do with kids.  It’s totally science and foods class in one, right?
The clean-up is a breeze!  Hot water melts the leftover chocolate right out of the pan.

Psalms 119:103 – How sweet are your words to my taste, sweeter than honey to my mouth!

Filed Under: All The Posts, Recipes

My Friend, Amy.

March 2, 2015 by Quin Leave a Comment

Amy Elizabeth Hild.
September 9th, 1987 – February 25th, 2015

Amy Elizabeth Hild

I’ve known Amy’s full name for well over 10 years, and I’ve never forgotten it.  She used to doodle it in her math notebook all.the.time.  She’d put fancy designs around her name and play around with different lettering.  She’d occasionally get called out for drawing, rather than looking at the board.  Amy later became a graphic designer.
It was apparent that this was her passion and gift, even as a kid.  How cool is that?
Amy was a year younger than me in high school, but we were in the same math class.  I’ve never been more grateful for my lack of math skills and dependence on a calculator.  It meant I got to spend an entire school year sitting next to Amy in Mr. Perry’s class at Clear Lake High School.
She was fun, she was honest, and she was beautiful.  She explained math to me in a way I could understand.  If I was stuck, she helped me, without judgment.  She did everything without judgment.
I never had any reason to be upset with her. I can remember one particular day when she gave me a picture of
herself.   Rather than the normal crappy school pictures this was a beautiful portrait that her parents took her to have
done.  She talked about singing in church and I remember thinking “Is there anything you DON’T do?”  I may have even said that out loud.  It didn’t make me jealous, but made me admire her even more.  She had so much talent, and she inspired me.
Last Wednesday was much like any other snowy day in Iowa.  We slacked a little on our traditional schooling and instead made tags to attach to a stack of sleds we bought to give away.
The kids were making their Random Act of Kindness tags as I supervised, taking pictures to blog about the experience.
They made a list of who they wanted to give them to, prayed over the list and for the people, and then went out delivering. Before I knew it they were having a little sledding party on the hill across the street.
Afterwards the kids and a neighbor mom ended up here, for treats and hot chocolate.  I silently praised God for our  neighborhood, and all the love and community we’ve found here.
I was distracted doing real life, and not checking my phone.  I love those moments.
We were living our day like a perfect tribute to Amy, before we even knew she was gone.  Amy was a good deeds do-er.  Yes, I made that phrase up, but it really does describe her.
After everyone left here I cleaned up and took a seat on the couch to “veg out” with my phone (it happens).  One of the first things I read on Facebook was this:

I yelled out a big “NO, NO, NO, NOT AMY!”

I worried that this was a mistake and felt bad about how it must have worried her family before they found out she was fine.  I sat like this for quite a while, before I realized how NOT FINE I was.  I was in absolute denial.  And I stayed that way, until this morning, when my husband and I attended Amy’s Celebration of Life.
I needed the closure, I needed the community. I am so thankful for all the people who were there, banned together in support for Amy’s family.
My heart ached for her fiancé, but by the end of the service, it just rejoiced.  He found Jesus through Amy.  How lucky he was to be so close to her and to spend all the days together that they did.  I think of all the experiences they had,  and I just smile.  Amy was an advocate for Jesus.  Her life was lived on purpose, with purpose.
 Her funeral was so large that, I kid you not, there were parking attendants directing traffic in the parking lot!
There was a room for overflow because the sanctuary was full, despite the staff/volunteers bringing in extra chairs, multiple times.  I mean WOW!  I can only hope to have a funeral where so many people come together to show support to my family, after I’ve passed.
Today as I sat down to start writing this I looked back at Amy and I’s Facebook messages to each other, dating way back to 2008.  I had forgotten all we’d been through and all we had talked about.  Now that she’s gone I can clearly see why we had some of those conversations when we did, even though at the time they didn’t seem like they would be so life changing.  They were.  For her and I both.  Amy didn’t use social media as a mask, it was a tool to her.  She was just as genuine online as she was in person.  She was a one of a kind.
I am forever grateful for getting to meet Amy Elizabeth Hild while she was on this Earth.  I’m grateful I was able to call her a friend, and I am grateful I was touched by her passionate spirit.  She taught me so much more than just some
silly math facts (sorry, Mr. Perry!).

Amy’s Obituary

Amy’s Blog

Filed Under: All The Posts, Celebrate Absolutely Everything, Encouragement Tagged With: Celebrate Absolutely Everything, Encouragement

How To Make Homemade Almond Milk -Recipe

January 10, 2015 by Quin Leave a Comment

Today I’m going to share with you a super simple DIY Homemade Almond Milk Recipe.
All you really need for this is Almonds and Water.  If you want to sweeten it up a bit and add a
little more flavor you can add a Pitted Date, a pinch of salt, and a small splash of vanilla.

Let’s get started!

Soak 1 C. of almonds in 4 C. of water overnight.
 
Your water will turn a funky color and you’ll wonder if it’s still okay to use.  Yes, it is.
 
 Strain off the water the almonds have been soaking in.
You end up with these nice beautiful plump looking almonds.
In a blender or food processor add your plump almonds (you can pull the skin off first if you’d like), and 4 C. of water.  If you chose to add the date, vanilla, and salt, now is the time. I did add those for this batch, that’s why the water is the color it is.
 
Turn it on and wait about a minute.  It doesn’t take too long at all to see the magic happening.
 
Strain the almond meal from the almond milk.  I had a small cry over some spilt milk, but we kept going anyway.  At this point you can use the back of a spoon to push some extra liquid through the strainer.  Thanks to my hubby for that creative thinking!  We got probably another half cup of almond milk from his trick!  Which is about how much we poured out on the counter!
Then just pour the milk into a jar and put it in the fridge!
Easy right? Now quit spending so much on store bought almond milk that can be full of fillers/processed junk.  Remember just because a label says “natural” doesn’t mean it’s actually natural.  You can totally make this!
The leftover almonds, called the almond meal are still very much edible.  I put ours in a covered container the fridge overnight because I didn’t feel like doing anything with them right away.
Today I toasted the almond meal on a pan in the oven at 425 for about 5-10 minutes. You can sprinkle it over just about anything; flavored or plain yogurts, oatmeal, hmm, maybe even some homemade ice cream…
FYI–  I’ve read you can keep homemade almond milk in the fridge about 3 days.  I don’t imagine it’ll last that long around here, especially because I love to blend up frozen coffee cubes and almond milk for a tasty midafternoon treat quite often.

Filed Under: All The Posts, Recipes

  • « Previous Page
  • 1
  • …
  • 5
  • 6
  • 7
  • 8
  • 9
  • …
  • 14
  • Next Page »

Welcome!

Categories

  • All The Posts (196)
  • Celebrate Absolutely Everything (48)
  • Encouragement (21)
  • Gift Guides (10)
  • Health and Wellness (13)
  • Homemaking (66)
  • Homeschool (32)
  • Marriage (6)
  • Parenting (61)
  • Recipes (33)
  • Thanks (6)

Copyright

Feel free to share links from A Slightly Better Life as long as they’re used in a kind, respectful way and proper credit is given. I ask that you include a link back to this site when you share, not copy the text.

All content is owned by Quincey B. and may not be republished elsewhere without permission.

Pinning to Pinterest? Sharing to Facebook or Instagram? Absolutely – and thank you!

Disclosure

As an Amazon Associate, I earn from qualifying purchases. This site contains affiliate links, which means I may earn a small commission if you click and purchase, at no extra cost to you. Thank you for supporting A Slightly Better Life!

Copyright © 2025 · Foodie Pro Theme on Genesis Framework · WordPress · Log in